Wednesday, July 6, 2022

Cisco AnyConnect installation on Archlinux

 "You are missing the required libraries for the authentication method you requested"

Some desktop environments do not come with the webkitgtk library the Cisco AnyConnect client uses to to generate the ONID sign in window. For debian based distributions the required library can be installed by running the following commands from terminal:

sudo pacman -S webkit2gtk

Friday, June 24, 2022

Switch from KMS to OEM

 To convert, do the following: 


• Press Windows Key + R 
• Type cmd in the run command line and press CTRL + SHIFT + ENTER to gain administrative access 
• Type: slmgr.vbs -ipk <enter your 25 digit Windows 10 RETAIL product key here> and press enter 
example: slmgr.vbs -ipk 12345ABCDE12345ABCD12345 
• Then type: slmgr.vbs -ato 

If you have no 25-digit Windows 10 Retail Key and the PC was purchased with pre-installed OEM license, you need to use the following Generic Key: 

YTMG3-N6DKC-DKB77-7M9GH-8HVX7 – If your had had Home version even if you upgraded to Pro through Windows Store 

VK7JG-NPHTM-C97JM-9MPGT-3V66T – If you had Pro. PC was purchased as Pro not upgraded from Home 

BT79Q-G7N6G-PGBYW-4YWX6-6F4BT – If you had a Single Language edition 

These Generic keys will just convert KMS to OEM but will not activate Windows. To activate, you need to go through the digital activation after the conversion by signing in with the Microsoft Account where your Digital Key is associated. To do that, go to Settings > Update & Security > Activation > Add an account 

* Note: If the activation says "Windows is activated with a digital license lined to your Microsoft Account", no need to do anything. 

Friday, June 17, 2022

MacBook Pro and Raspberry Pi4

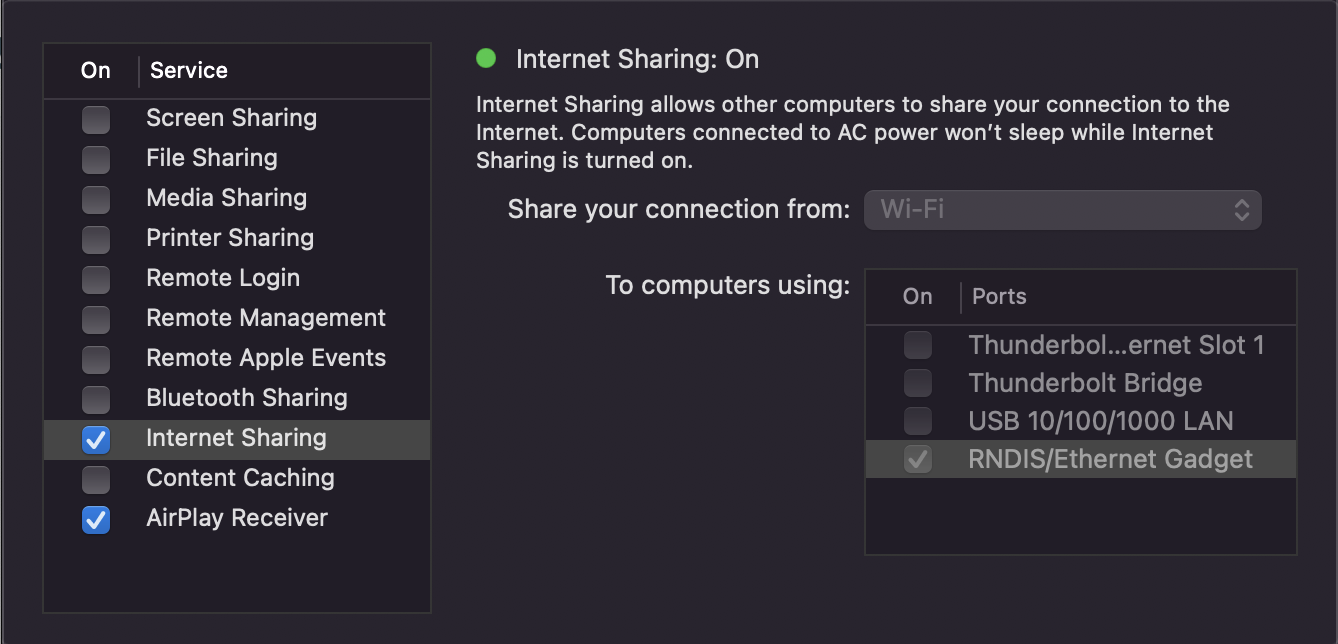
This tutorial showing how to connect Raspberry Pi4 to MacBook Pro via USB-C (used to power the Pi) and share internet from MacBook to the Pi. Works for Debian and Kali linux images.

-  Image Kali/Debian to Raspberry Pi

- Edit file /boot/config.txt, add

[all]

dtoverlay=dwc2,dr_mode=peripheral

- Edit file /boot/cmdline.txt

console=serial0,115200 console=tty1 root=PARTUUID=ef15daca-02 rootfstype=ext4 fsck.repair=yes modules-load=dwc2,g_ether rootwait

- Create usb0 interface at /etc/network/interfaces.d/usb0

auto usb0

    allow-hotplug usb0

    iface usb0 inet dhcp

On MacBook, open System Preferences 


Thursday, June 16, 2022

Kali Linux In a Docker Container

 Update: this post has been updated and works as of June 2020 (official Offensive Security image names have changed).

Background

Wednesday, February 5, 2020

Complex Data Types in Python: Shallow & Deep Copies in Python

Complex Data Types in Python: Shallow & Deep Copies in Python


Learn about copying operations on containers in Python. You will learn the subtle distinction between shallow and deep copies. Changes made to shallow copies affect the original whereas with deep copies do not.

Table of Contents

  1. Course Overview
  2. Copying Strings
  3. Performing Shallow Copies of Lists
  4. Performing Deep Copies of Lists
  5. Creating Shallow and Deep Copies of Tuples
  6. Creating Shallow Copies of Dictionaries
  7. Creating Deep Copies of Dictionaries
  8. Creating Shallow and Deep Copies of Sets
  9. Exercise: Shallow and Deep Copies

Shallow and Deep Copies

- A shallow copy are made when two variables with different variable names point to the same location in memory.
- Updates that you make using one variable are reflected when accessing the same data using the other variable.
- The same complex data type has just two names with shallow copies.
- Deep copies are made when the same data is copied over to an entirely new memory location.
- Changes made to the deep copy are not reflected in the original memory.

String Copy

- String are immutable in Python
- Once created, strings cannot be updated
- Using assignment operations with strings reference the same location in memory
- But that location cannot be changed
- Assigning a new string value to a variable just creates a new string

list_b=list_a (Shallow Copy)

list_b=list_a[:] (Deep Copy)

list_b=copy.copy(list_a) (Deep Copy of the outer list but shallow copies of nay complex data types)

list_b=copy.deepcopy(list_a) (Deep Copy of the outer list and all of the nested data types)

Monday, July 15, 2019

Windows update error with 80072efd

http://www.puryear-it.com/blog/2012/07/27/windows-server-update-fails-with-error-80072efd/
"One issue which causes Windows Updates to fail with error 80072EFD is if the Windows Server is looking at itself or another Server on the network for the updates.
To  check this:
  1. Click Start > Run > type “regedit” without the quotes, and accept the UAC prompt to continue
  2. Navigate to HKLM\Software\Policies\Microsoft\Windows\WindowsUpdate
  3. Look at the keys in that folder, if they look something like this:
    “WUServer”=http://srv_name:8530
    “WUStatusServer”=http://srv_name:8530
If this entries are listed under that folder, backup then delete the WindowsUpdate folder
  1. Right-click on the folder and select “export” to save.
  2. Delete the “WindowsUpdate” key from the registry at HKLM\Software\Policies\Microsoft\Windows.
  3. Restart the Windows Update service. (located in Start > Run > type “services.msc” without quotes)"

Thursday, April 4, 2019

How to reset Windows 10 account passwords

Windows 10 users who forgot the password of a user account cannot sign in to that account anymore. Certain options are provided to reset the password depending on the account type and other parameters such as whether it is a work account managed by an IT department or a home account.
Windows 10 supports two main account types: local accounts and Microsoft accounts. Local accounts exist only on the device, Microsoft accounts globally.
The account type determines whether it is possible to reset an account password. The solution is straightforward for Microsoft accounts as it is possible to reset the account password online.

Thursday, March 28, 2019

UNTRUSTED CERT TITLE

I'm trying to reinstall macOS Sierra from the recovery partition, and I'm getting an error when it is checking for eligibility "UNTRUSTED CERT TITLE "

To fix this, simply update date time in your Mac by going to terminal:
ntpdate -u time.apple.com

Tuesday, January 23, 2018

Remove queue on printer

When you cannot cancel, delete, remove queue files on printer, please follow this:
Open services.msc --> stop 'Print Spooler' service.
Go to C:\Windows\System32\spool\PRINTERS and remove all items here.
Start 'Print Spooler' and check.

Tuesday, June 27, 2017

Nginx Configuration to block SQL Injection and similar attacks

location ~* "(eval\()" { deny all; }
location ~* "(127\.0\.0\.1)" { deny all; }
location ~* "([a-z0-9]{2000})" { deny all; }
location ~* "(javascript\:)(.*)(\;)" { deny all; }
location ~* "(base64_encode)(.*)(\()" { deny all; }
location ~* "(GLOBALS|REQUEST)(=|\[|%)" { deny all; }
location ~* "(<|%3C).*script.*(>|%3)" { deny all; }
location ~ "(\\|\.\.\.|\.\./|~|`|<|>|\|)" { deny all; }
location ~* "(boot\.ini|etc/passwd|self/environ)" { deny all; }
location ~* "(thumbs?(_editor|open)?|tim(thumb)?)\.php" { deny all; }
location ~* "(\'|\")(.*)(drop|insert|md5|select|union)" { deny all; }
location ~* "(https?|ftp|php):/" { deny all; }
location ~* "(=\\\'|=\\%27|/\\\'/?)\." { deny all; }
location ~* "/(\$(\&)?|\*|\"|\.|,|&|&amp;?)/?$" { deny all; }
location ~ "(\{0\}|\(/\(|\.\.\.|\+\+\+|\\\"\\\")" { deny all; }
location ~ "(~|`|<|>|:|;|%|\\|\s|\{|\}|\[|\]|\|)" { deny all; }
location ~* "/(=|\$&|_mm|(wp-)?config\.|cgi-|etc/passwd|muieblack)" { deny all; }
location ~* "(&pws=0|_vti_|\(null\)|\{\$itemURL\}|echo(.*)kae|etc/passwd|eval\(|self/environ)" { deny all; }
location ~* "\.(aspx?|bash|bak?|cfg|cgi|dll|exe|git|hg|ini|jsp|log|mdb|out|sql|svn|swp|tar|rdf)$" { deny all; }
location ~* "/(^$|mobiquo|phpinfo|shell|sqlpatch|thumb|thumb_editor|thumbopen|timthumb|webshell)\.php" { deny all; }


https://gist.github.com/VirtuBox/5fedc39c30813f5373aa8ae9328a0ec3

Tuesday, May 9, 2017

Debian 8 Jessie Sample Preseed

#### Contents of the preconfiguration file (for jessie)
### Localization
d-i debian-installer/locale string en_US.UTF-8
d-i debian-installer/keymap select us
#d-i keymap select us
d-i keyboard-configuration/xkb-keymap select us

# Scan another CD or DVD?
apt-cdrom-setup apt-setup/cdrom/set-first       boolean false

### Network configuration
d-i netcfg/choose_interface select auto
# Manual
#d-i netcfg/get_nameservers  string 192.168.1.5
#d-i netcfg/get_ipaddress    string 192.168.1.10
#d-i netcfg/get_netmask      string 255.255.255.0
#d-i netcfg/get_gateway      string 192.168.1.1
#d-i netcfg/confirm_static   boolean true
#d-i netcfg/get_hostname string localhost
#d-i netcfg/get_domain string localdomain.com
#d-i netcfg/hostname string localhost

### Mirror settings
d-i apt-setup/use_mirror boolean true
d-i mirror/protocol string http
d-i mirror/country string manual
d-i mirror/http/hostname string debian.xtdv.net
d-i mirror/http/directory string /debian
d-i mirror/suite string jessie
d-i mirror/http/proxy string


### Account setup
d-i passwd/root-login boolean false
d-i passwd/make-user boolean true
d-i passwd/user-fullname string John
d-i passwd/username string john
d-i passwd/user-password-crypted password $6$pp9kuTEa$4rIwzjBHUK0jyRC1vE73k7EdQWu8azUCPkwHNOf1BCcV9AC74RVMiGGxKgwn4nxL2GIGSh5orkA8qirDjkJTI1
d-i passwd/user-uid string 1000
d-i passwd/user-default-groups string sudo adm

### Clock and time zone setup
d-i clock-setup/utc boolean true
d-i time/zone string Asia/Ho_Chi_Minh
d-i clock-setup/ntp boolean true

### Partitioning
d-i partman-auto/disk string /dev/sda
d-i partman-auto/method string lvm
d-i partman-auto/purge_lvm_from_device  boolean true
d-i partman-auto/choose_recipe select boot-root
d-i partman-auto-lvm/new_vg_name string system
d-i partman-auto/expert_recipe string                   \
        boot-root ::                                    \
        103 100 205 ext4                                \
                $primary{ }                             \
                $bootable{ }                            \
                method{ format } format{ }              \
                use_filesystem{ } filesystem{ ext4 }    \
                mountpoint{ /boot }                     \
        .                                               \
        1024 110 2048 ext4                              \
                $lvmok{ }                               \
                method{ format } format{ }              \
                use_filesystem{ } filesystem{ ext4 }    \
                mountpoint{ / }                         \
        .                                               \
        1024 120 3096 ext4                              \
                $lvmok{ }                               \
                method{ format } format{ }              \
                use_filesystem{ } filesystem{ ext4 }    \
                mountpoint{ /var }                      \
        .                                               \
        512 130 1024 ext4                               \
                $lvmok{ }                               \
                method{ format } format{ }              \
                use_filesystem{ } filesystem{ ext4 }    \
                mountpoint{ /var/lib/mysql }            \
        .                                               \
        512 140 1024 ext4                               \
                $lvmok{ }                               \
                method{ format } format{ }              \
                use_filesystem{ } filesystem{ ext4 }    \
                mountpoint{ /www }                      \
        .                                               \
        512 150 1024 ext4                               \
                $lvmok{ }                               \
                method{ format } format{ }              \
                use_filesystem{ } filesystem{ xfs }     \
                mountpoint{ /tmp }                      \
        .                                               \
        2048 160 3096 ext4                              \
                $lvmok{ }                               \
                method{ format } format{ }              \
                use_filesystem{ } filesystem{ ext4 }    \
                mountpoint{ /usr }                      \
        .                                               \
        512 170 1024 linux-swap                         \
                $lvmok{ }                               \
                method{ swap } format{ }                \
        .                                               \
        2048 10 3096 ext4                               \
                $lvmok{ }                               \
                method{ format } format{ }              \
                use_filesystem{ } filesystem{ xfs }     \
                mountpoint{ /home }                     \
        .
d-i partman/confirm boolean true
d-i partman-lvm/confirm boolean true
d-i partman-lvm/confirm_nooverwrite boolean true
d-i partman-lvm/device_remove_lvm boolean true
#d-i partman-lvm/confirm boolean true
d-i partman/choose_partition \
        select Finish partitioning and write changes to disk
d-i partman/confirm_nooverwrite boolean true
d-i partman/mount_style select uuid
d-i grub-installer/only_debian boolean true
d-i grub-installer/with_other_os boolean true
#d-i grub-pc/install_devices multiselect /dev/sda
d-i grub-installer/bootdev  string /dev/sda

### Apt setup
d-i apt-setup/non-free boolean true
d-i apt-setup/contrib boolean true
d-i apt-setup/services-select multiselect security, updates
d-i apt-setup/security_host string security.debian.org

# Dotdeb
#d-i apt-setup/local0/repository string http://packages.dotdeb.org wheezy all
#d-i apt-setup/local0/comment string Dotdeb
#d-i apt-setup/local0/source boolean true
#d-i apt-setup/local0/key string http://www.dotdeb.org/dotdeb.gpg

#d-i apt-setup/local1/repository string http://packages.dotdeb.org wheezy-php55 all
#d-i apt-setup/local1/comment string Dotdeb-PHP55
#d-i apt-setup/local1/source boolean true
#d-i apt-setup/local1/key string http://www.dotdeb.org/dotdeb.gpg

# Puppet
#d-i apt-setup/local2/repository string http://apt.puppetlabs.com wheezy main
#d-i apt-setup/local2/comment string Puppet
#d-i apt-setup/local2/source boolean true
#d-i apt-setup/local2/key string http://apt.puppetlabs.com/keyring.gpg

#d-i apt-setup/local2/repository string http://apt.puppetlabs.com wheezy dependencies
#d-i apt-setup/local2/comment string Puppet-Dependencies
#d-i apt-setup/local2/source boolean true
#d-i apt-setup/local2/key string http://apt.puppetlabs.com/keyring.gpg

### Package selection
tasksel tasksel/first multiselect none
d-i pkgsel/include string openssh-server curl
d-i pkgsel/upgrade select none
popularity-contest popularity-contest/participate boolean false

### Misc options
# Disable that annoying WEP key dialog.
#d-i netcfg/wireless_wep string
# Allow non-free firmware
d-i hw-detect/load_firmware boolean true
# Avoid that last message about the install being complete.
d-i finish-install/reboot_in_progress note

### Set up firstboot
#d-i preseed/late_command string chroot /target sh -c "/usr/bin/curl -o /tmp/postinstall http://vtm-svn-01.luxoft.com/postinstall && /bin/sh -x /tmp/postinstall"

Tuesday, April 25, 2017

Convert Ubuntu Desktop to Server

# update
sudo apt-get update

# install the 'tasksel' package so we can remove the desktop image       
sudo apt-get install tasksel

# remove the desktop image
sudo tasksel remove ubuntu-desktop

# tell tasksel to start the server image setup
sudo tasksel install server

# install the server images
sudo apt-get install linux-server linux-image-server

# remove lightdm
sudo apt-get purge lightdm

# remove all packages no longer required (~400 MB)
sudo apt-get autoremove

Monday, April 17, 2017

Upgrade Ubuntu 16.04 to 16.10 command line

First, SSH into your Ubuntu 16.04 server and upgrade all software.
$sudo apt-get update && sudo apt-get upgrade && sudo apt-get dist-upgrade

Then make sure you have update-manager-core package installed.
$sudo apt-get install update-manager-core

Next, edit a configuration file.
$sudo nano /etc/update-manager/release-upgrades
At the bottom of this file, change the value of Prompt from lts to normal.
Prompt=normal
Save and close the file. After that, run the following command to begin the upgrade process and follow the on-screen instructions.
$do-release-upgrade -d

Once the upgrade is finished, reboot your Ubuntu server. To check your Ubuntu version, run:
$lsb_release -a

Tuesday, April 4, 2017

Install Sky on Linuxmint 18.1

In able to use Lync in Linux, Sky will be good option. This installation for Linuxmint 18.1
  • Go to https://tel.red/repos.htm
  • Repo for Linuxtmint 18.1 equal to Ubuntu 16.04
  • Copy "deb https://tel.red/repos/ubuntu xenial non-free" to /etc/apt/source.list
  • Download and register TEL.RED software signing public key
sudo apt-key adv --keyserver hkp://keyserver.ubuntu.com:80 --recv-keys 9454C19A66B920C83DDF696E07C8CCAFCE49F8C5
sudo apt-get update
sudo apt-get install sky

Wednesday, March 29, 2017

Outlook Stationery Fonts changing to Arial after closing Outlook

Go to Signatures, then "Personal Stationary" tab and change fonts. It was being defaulted to Arial from here which was somehow overriding the "Stationary and Fonts" selection.

Tuesday, March 28, 2017

How to Disable the Write Protection on Dell Windows 10 USB Recovery Sticks

The world is full of different kinds a people, but one thing that seems to bring us all together is that everyone wants to be able to write to their Dell USB recovery drive. I'm not yet convinced that this one little slice of common ground can end wars and dispel years of hatred, but the one thing I am sure of is that with just the slightest effort... we can all write to these things.

It's been a while, but finally we have a solution for the Dell Windows 10 recovery drives. This time Tom Weber posted the solution in the round 3 post. Thanks Tom. All I did below was take his solution and add some screen clips. All the credit should go to him.

As of the time of this post, this works for all Dell Windows 10 USB recovery flash drives.

Download MPALL_F1_7F00_DL07_v503_0A.rar from Mega.nz and uncompress it to a folder. The Mega.nz decryption key is !3mpx__atjBu-zBVtxTlvsya-uiIsSFK7q5ddcULiCgw and the MD5 hash of the file is E37A0C352EFF3415E7DB2E6A6CF7F5EB. With this hash you should be able to verify that the file you downloaded is exactly the same as the file I uploaded. I can't guarantee anything else about this file. Use it at your own risk.

Caution! The following steps WILL DELETE EVERYTHING ON THE USB DRIVE!


Thursday, December 8, 2016

APT-GET ignores certificate check

When you want to add a repository that your Debian like does not have, for example I want to install 'sky' from tel.red repository.

For some reason our firewall block some untrusted certificate, to ignore checking certificates from apt-get, add this line to your /etc/apt/apt.conf file

Acquire::https::tel.red::Verify-Peer "false";

Please do this at your own risk, because not checking certificates may lead to install harmful software from that repository 

Thursday, March 31, 2016

Kiến thức cơ bản cấu tạo ô tô từ A-Z (IV)

Bài 13 - Hệ thống khí thải
Các bác lưu ý là từ đầu đến giờ e chỉ nói về động cơ xăng thôi nhé, e chưa nói gì đến diezel cả, bởi nhiều thứ các bác ko thể nạp hết đc, dẫn đến khó hiểu, quên, và sinh ra chán nản. Về cơ bản, các bác hiểu xăng thì hiểu về diesel chỉ trong nháy mắt, nên cứ yên tâm nhé.
[​IMG]
Hình 13.1 - Hệ thống khí thải trên xe hơi

Kiến thức cơ bản cấu tạo ô tô từ A-Z (III)

Bài 9: Kỹ thuật kiểm tra dầu động cơ và thay dầu động cơ

Vậy là các bác đã hình dung được toàn bộ hệ thống bôi trơn động cơ chưa? Giờ chúng ta sẽ tìm hiểu cách thay dầu nhớt động cơ nhé. Thường 3000-5000km hoặc 3 tháng nên thay dầu 1 lần, tuy nhiên xe đời giờ thì lâu hơn, cái này các bác tự tìm hiểu.
Bước 1: Tháo dầu cũTrong bài 8 (phần cuối), video tháo động cơ, các bác thấy trên các te có cái ốc to to ko, e có chú thích là chỗ tháo dầu đó, các bác xem lại nhé. Và ở bài 8 (phần 2) trong video lắp sinh hàn cho động cơ, các bác để ý phần đầu cách người ta tháo dầu trong các te và lọc dầu nhé. Đơn giản thôi mà. Chỉ lưu ý các bác khi tháo dầu nên để máy nóng nhé, dầu nó loãng dễ chảy hơn. Và các bác cứ 2 lần thay dầu thì nên thay 1 lần lọc dầu.
Bước 2: Đổ dầu vàoCứ mở nắp trên động cơ đổ dầu vào thôi. Bác nào ko biết thì nghỉ bà nó đi, đọc từ bài đầu đến giờ mà còn chưa biết đổ dầu vào chỗ nào thì hết chỗ nói. Ha ha.Tổng lượng dầu trong động cơ khoảng 3 đến 5 lít.