The world is full of different kinds a people, but one thing that seems to bring us all together is that everyone wants to be able to write to their Dell USB recovery drive. I'm not yet convinced that this one little slice of common ground can end wars and dispel years of hatred, but the one thing I am sure of is that with just the slightest effort... we can all write to these things.
It's been a while, but finally we have a solution for the Dell Windows 10 recovery drives. This time Tom Weber posted the solution in the round 3 post. Thanks Tom. All I did below was take his solution and add some screen clips. All the credit should go to him.
As of the time of this post, this works for all Dell Windows 10 USB recovery flash drives.
Download MPALL_F1_7F00_DL07_v503_0A.rar from Mega.nz and uncompress it to a folder. The Mega.nz decryption key is !3mpx__atjBu-zBVtxTlvsya-uiIsSFK7q5ddcULiCgw and the MD5 hash of the file is E37A0C352EFF3415E7DB2E6A6CF7F5EB. With this hash you should be able to verify that the file you downloaded is exactly the same as the file I uploaded. I can't guarantee anything else about this file. Use it at your own risk.
Caution! The following steps WILL DELETE EVERYTHING ON THE USB DRIVE!
Once you've downloaded and uncompressed the MPALL utility, drill down into the folder and run MPALL_F1_7F00_DL07_v503_0A.exe.

If you haven't already plugged your Dell USB stick in, plug it in now and click the Update button.

The USB drive should show up in one of the boxes. If it doesn't, try moving it to a different USB port and clicking the Update button again. Repeat as needed. Keep trying different USB ports until the drive shows up in the utility.
Once MPALL shows the USB device is connected, click the Setting button.

Select Basic Setting and New Setting and click OK.

In the settings window, click the Controller drop down and select PS2251-07. Select USB 2.0 or 3.0 from the Host Port drop down depending on what type of port you have the drive plugged into.
Check the Do ISP and Erase code block check boxes. Click Select to browse to the burner file BN07V502TAW.BIN and the firmware file FW07V50253TW.BIN in the MPALL_F1_7F00_DL07_v503_0A folder.
Next, under the Customise Setting section, uncheck the Auto Detect box and input the VID 0930 and PID 1400.

Your settings should look something like this. At this point, you can hit the Save button and close the settings window or click Save As and save the settings to an .ini file. With the .ini file you can quickly load the settings in the future either here, on the setting page, or in the drop down in the upper right of the main MPALL window.

Back at the main window, you might need to click Update again if your drive isn't displayed or is grayed out. When you're ready, click the Start button and relax.

After a few seconds, you should see your drive displayed in green and it should be writable.
This method works for now, but we've seen at least four iterations of these USB flash drives that require different software to low-level format. Something will change and we'll be back to square one again. Good luck.
It's been a while, but finally we have a solution for the Dell Windows 10 recovery drives. This time Tom Weber posted the solution in the round 3 post. Thanks Tom. All I did below was take his solution and add some screen clips. All the credit should go to him.
As of the time of this post, this works for all Dell Windows 10 USB recovery flash drives.
Download MPALL_F1_7F00_DL07_v503_0A.rar from Mega.nz and uncompress it to a folder. The Mega.nz decryption key is !3mpx__atjBu-zBVtxTlvsya-uiIsSFK7q5ddcULiCgw and the MD5 hash of the file is E37A0C352EFF3415E7DB2E6A6CF7F5EB. With this hash you should be able to verify that the file you downloaded is exactly the same as the file I uploaded. I can't guarantee anything else about this file. Use it at your own risk.
Caution! The following steps WILL DELETE EVERYTHING ON THE USB DRIVE!
Once you've downloaded and uncompressed the MPALL utility, drill down into the folder and run MPALL_F1_7F00_DL07_v503_0A.exe.

If you haven't already plugged your Dell USB stick in, plug it in now and click the Update button.

The USB drive should show up in one of the boxes. If it doesn't, try moving it to a different USB port and clicking the Update button again. Repeat as needed. Keep trying different USB ports until the drive shows up in the utility.
Once MPALL shows the USB device is connected, click the Setting button.
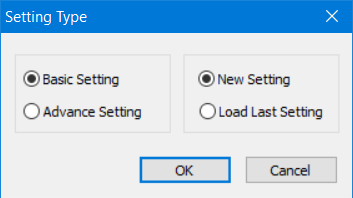
Select Basic Setting and New Setting and click OK.

In the settings window, click the Controller drop down and select PS2251-07. Select USB 2.0 or 3.0 from the Host Port drop down depending on what type of port you have the drive plugged into.
Check the Do ISP and Erase code block check boxes. Click Select to browse to the burner file BN07V502TAW.BIN and the firmware file FW07V50253TW.BIN in the MPALL_F1_7F00_DL07_v503_0A folder.
Next, under the Customise Setting section, uncheck the Auto Detect box and input the VID 0930 and PID 1400.

Your settings should look something like this. At this point, you can hit the Save button and close the settings window or click Save As and save the settings to an .ini file. With the .ini file you can quickly load the settings in the future either here, on the setting page, or in the drop down in the upper right of the main MPALL window.

Back at the main window, you might need to click Update again if your drive isn't displayed or is grayed out. When you're ready, click the Start button and relax.

After a few seconds, you should see your drive displayed in green and it should be writable.
This method works for now, but we've seen at least four iterations of these USB flash drives that require different software to low-level format. Something will change and we'll be back to square one again. Good luck.
No comments:
Post a Comment